
Your AC has probably been running hard all week. The thermostat says one thing, the house feels another way, and the air still feels a little sticky by late afternoon. Around Tampa Bay, that usually sends homeowners looking at the thermostat, the filter, or the age of the system. A lot of the time, the quieter problem is coil buildup.
Florida is rough on air conditioners. Humidity hangs on the system for long stretches. Pollen coats outdoor equipment in season. Salt air reaches inland more than people expect. Summer storms blow leaves, grit, and mulch into condenser cabinets. All of that lands right where your AC needs clean metal surface area to move heat.
That's why AC coils cleaning matters. It's not cosmetic work. It's airflow, heat transfer, moisture removal, and system strain. If you own a home in Tampa Bay, knowing what you can clean yourself, what you shouldn't touch, and when to call for diagnosis can save you a lot of frustration.
Why Clean Coils Are Your ACs Best Friend in Florida
When a Tampa Bay home feels cool enough on paper but clammy in real life, the AC often isn't moving heat the way it should. The coil surfaces are where that heat exchange happens. Once dirt, salt film, pollen, and organic buildup start covering those surfaces, the system has to work harder to do the same job.
That matters more here than in milder climates. Florida systems run for long stretches, and they don't get much downtime to recover. A lightly fouled coil in another state might be an inconvenience. In Tampa, it can show up fast as longer run times, weaker comfort, and that muggy feeling that makes a house seem warmer than the thermostat reading.
EVAPCO notes that dirty AC coils can cause up to a 30% decrease in system effectiveness, and routine cleaning can improve efficiency by as much as 16% in some cases, which is a meaningful swing when your equipment is working through a long cooling season in a humid climate like Florida. EVAPCO's coil cleaning guidance
What the coils are actually doing
Your system has two jobs people notice right away. It removes heat, and it helps pull moisture out of indoor air. The coils are central to both jobs.
- Outdoor condenser coil handles the heat your system is trying to dump outside.
- Indoor evaporator coil absorbs heat from indoor air and plays a major role in dehumidification.
- Dirty coil surfaces reduce airflow and heat transfer, so the system runs longer to chase the same indoor temperature.
Clean coils help the whole machine do less work. Dirty coils force every other component to carry more load.
That's why coil cleaning isn't just a maintenance box to check. It's one of the few routine tasks that directly affects comfort in a Florida home. If you want a quick visual tied to local cooling conditions, this Tampa Bay cooling snapshot shows the kind of weather stress local systems deal with.

Signs Your AC Coils Are Crying for Help
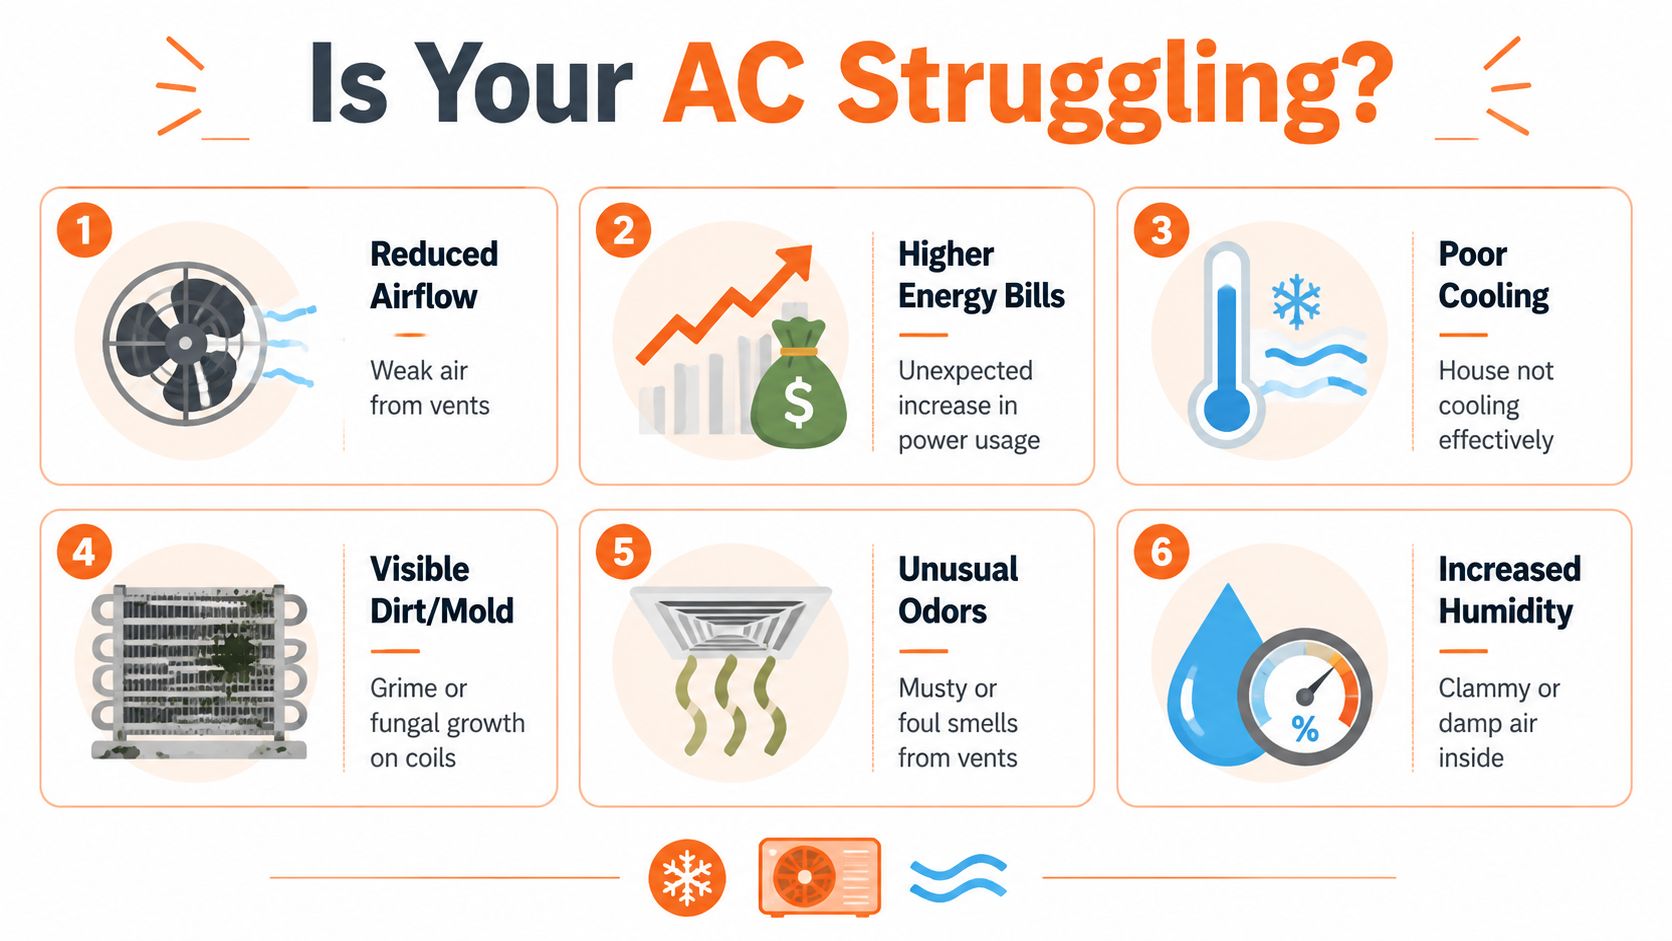
A dirty coil doesn't always announce itself with a dramatic breakdown. More often, homeowners notice that the house just doesn't feel right. Cooling takes longer. The air feels damp. The system seems to run and run, especially in the afternoon.
What to look for around the house
If you're trying to decide whether AC coils cleaning belongs on your weekend list, start with what you can see, smell, and feel.
- Longer cooling cycles. The house eventually cools, but it takes much longer than it used to.
- Weak airflow impression. Air may still be moving, but rooms don't recover as quickly after doors open or sunlight heats the space.
- Musty or stale smell. Indoor coil contamination can contribute to odors, especially in a damp air handler.
- Higher indoor humidity. The home feels clammy even when the temperature setting seems reasonable.
- Visible grime on the outdoor unit. Cottonwood-type fuzz, pollen dust, grass clippings, or storm debris caught in the fins are easy warning signs.
Along the coast, salt film adds another layer of trouble. In neighborhoods with active construction, fine dust packs into the outdoor coil faster than many people expect. In spring, yellow pollen can coat a condenser in a hurry. After summer storms, leaves and palm debris often get pulled against the cabinet.
How often Tampa Bay homeowners should check
The standard once-a-year advice is a floor, not a target, for many homes here. Barron Heating says coils should be cleaned at least once a year, and homes in dusty or pollen-heavy locations may need service 2 to 4 times per year. Barron Heating's coil cleaning best practices
That doesn't mean every house needs full cleaning that often. It does mean your inspection rhythm should be tighter in Florida.
A simple local schedule works well:
- Spring pollen check after the yellow dust starts collecting.
- Mid-summer look when the system has been under steady load.
- Post-storm inspection after heavy wind or yard debris.
- Fall review if your home sits near water, trees, or active road dust.
For a local reminder of how seasonal conditions can affect home systems, this home comfort image from Heatwave fits the point well.

If the outdoor coil looks matted over, don't wait for a no-cooling call. Tampa weather doesn't give AC systems much slack.
Cleaning Your Outdoor Condenser Coils The Right Way
The outdoor condenser is the part most homeowners can handle, if they stay within safe limits. This is the DIY side of AC coils cleaning that makes sense for a handy homeowner. The key is using the right sequence and not getting aggressive.
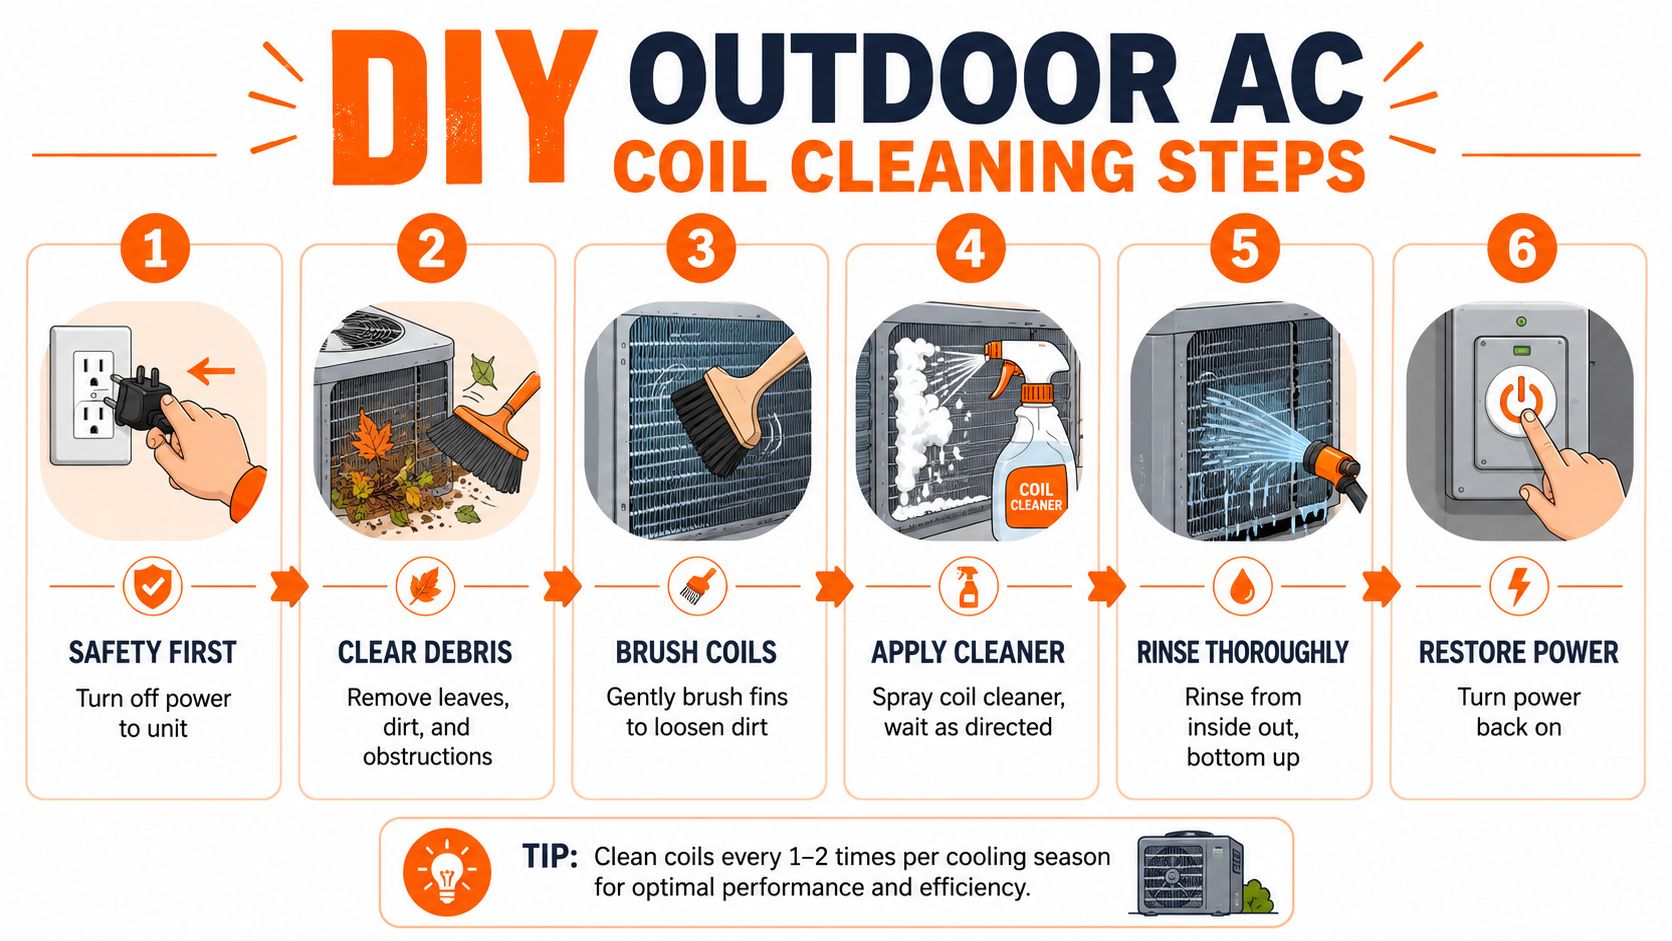
Bryant's cleaning workflow is straightforward. Shut off power, remove access panels, clear loose debris with a soft brush or shop vac, apply a foaming coil cleaner, wait for the product's dwell time, rinse with low-pressure water, and let the unit dry before restoring power. Bryant's condenser coil cleaning instructions
Start with safety, not tools
Before you touch the cabinet, turn the system off at the thermostat. Then shut off power at the breaker and the disconnect if your setup has one. Don't assume the thermostat alone makes the unit safe.
After that, gather only what you need:
- Soft brush for surface debris
- Shop vac with soft attachment if you have one
- Dedicated foaming coil cleaner
- Garden hose with gentle spray
- Screwdriver or nut driver for access panels
- Work gloves and eye protection
What you should not bring is just as important.
| Avoid this | Why it causes trouble |
|---|---|
| Pressure washer | It can flatten fins and block airflow |
| Stiff wire brush | It tears and bends aluminum fins |
| Random household chemicals | They can leave residue or damage metal |
| Flooding the unit aggressively | It packs debris deeper and can create a mess inside the cabinet |
The cleaning order matters
A lot of DIY jobs go wrong because people start with water. That turns dry debris into mud and pushes it deeper into the fins.
Use this order instead:
- Cut power fully
- Remove the top or side panels as needed
- Lift out leaves, twigs, and heavy debris by hand
- Brush or vacuum loose dirt off first
- Apply the foaming cleaner and let it sit as directed
- Rinse gently with low pressure
- Let the unit dry
- Reassemble and restore power
Practical rule: Dry debris comes off before cleaner and water go on.
If the fins are visibly bent, don't start poking at them with a screwdriver or knife. Minor fin straightening can help airflow, but careless DIY work often creates a larger blocked area than the dirt did.
Here's a visual resource some homeowners find useful before opening their cabinet: this condenser-related image.

How to rinse without doing damage
Gentle water wins. You're flushing dirt out, not blasting concrete.
Aim for a soft stream and work patiently. If you can rinse from the inside out after removing panels safely, that helps move debris away from the coil rather than deeper into it. If your unit design doesn't give easy access, stay gentle from the outside and don't force anything apart.
In Florida, I also tell homeowners to look at what got into the unit in the first place. Stuck oak leaves, palm fibers, mulch dust, and lawn clippings all tell you something about the area around the condenser. Cleaning the coil but leaving the unit buried in landscaping just means you'll be back at it too soon.
This video can help you visualize the process before you start:
What works and what doesn't
What works is patience, low pressure, and a coil-safe cleaner.
What doesn't work is rushing, soaking electrical components, crushing fins, or treating the condenser like a driveway. The biggest DIY mistake I see is homeowners assuming more force means a cleaner coil. On AC equipment, more force often means less airflow when you're done.
If you're careful, outdoor AC coils cleaning is a realistic maintenance task. If the cabinet is hard to open, the fan assembly is awkward to move, or the coil is caked with heavy residue, that's the point to stop and hand it off.
A Word of Caution on Indoor Evaporator Coils
The outdoor unit is one thing. The indoor evaporator coil is another job entirely.
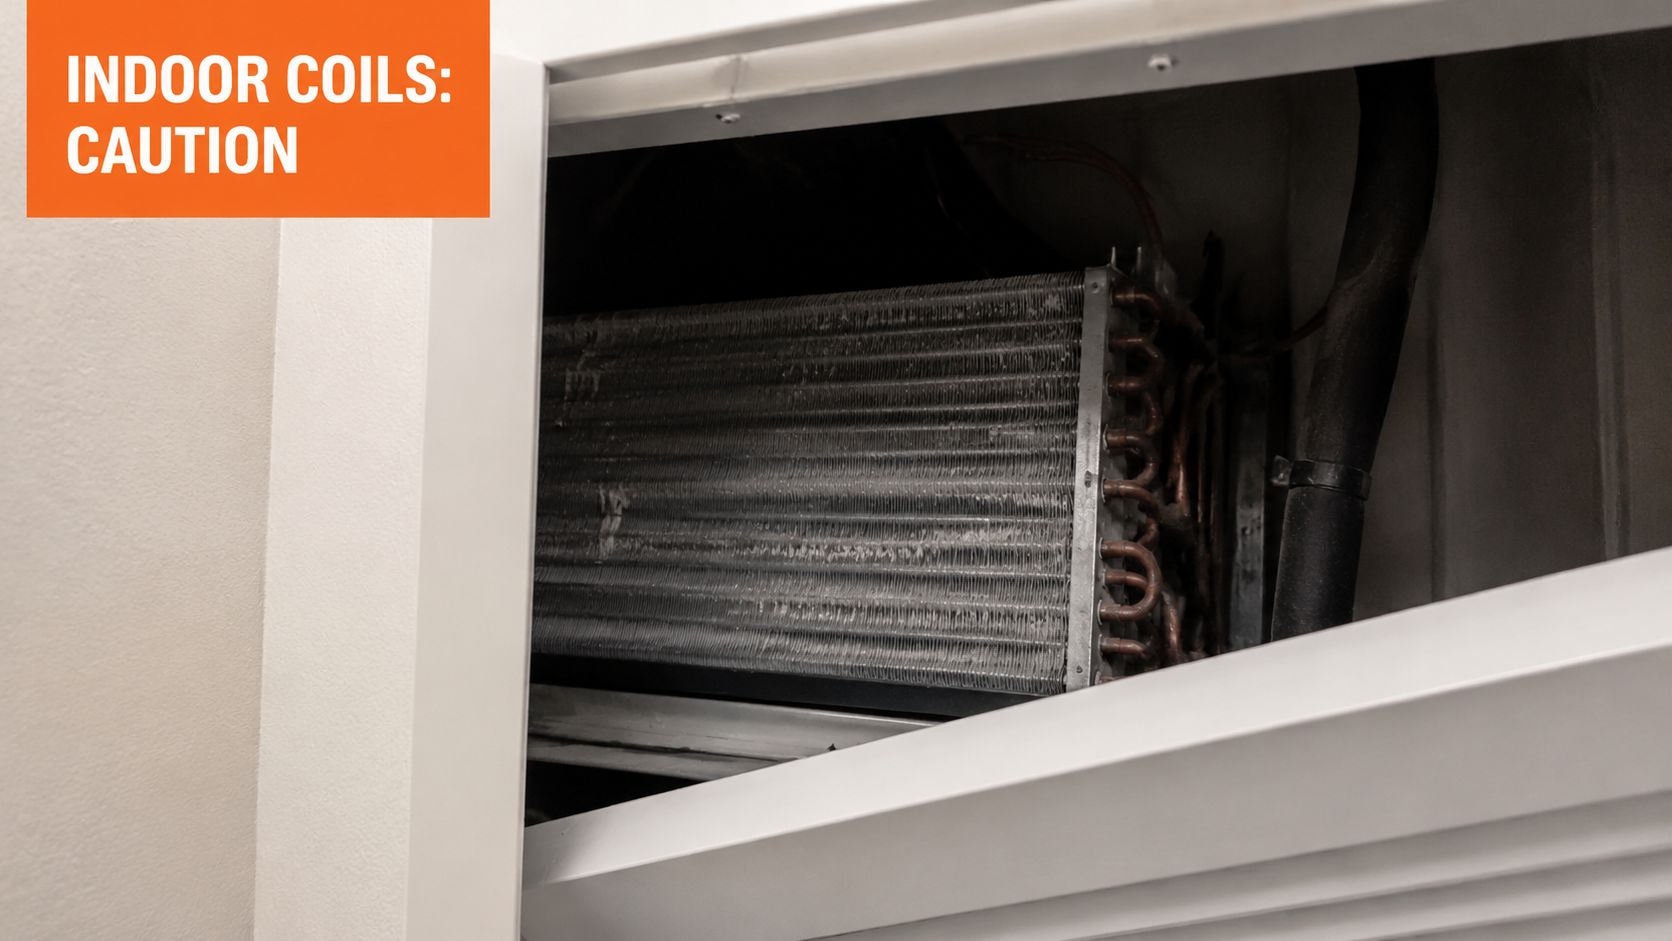
Many generic online advice articles oversimplify the task. Indoor coils are tucked inside an air handler, often in a tight closet, attic, or garage setup. Access is tighter. Drainage matters more. And the fins are easy to damage before you realize you've done it.
Simple Green's guidance highlights that the risk of over-cleaning or using the wrong method is highest with indoor evaporator coils, which need gentle, low-pressure rinsing and non-acidic, low-residue cleaners to reduce the chance of corrosion and damage. Simple Green's coil cleaning guidance
Why indoor coils are less forgiving
Outdoor condensers are exposed and built to live outside. Indoor evaporator sections are part of a more delicate assembly. In Tampa Bay homes, they also spend a lot of time dealing with humidity load, so any mistake around the drain system can show up fast.
Here's where homeowners get into trouble:
- Delicate fins bend with very little force.
- Drain pans and drain lines can overflow if debris shifts or water is applied poorly.
- Cabinet access is often awkward, which leads to accidental damage.
- Chemical choice matters more indoors because residue and fumes stay in the occupied space.
- Coatings on modern coils don't always tolerate harsh cleaners well.
The hidden risk isn't just the coil
A bad indoor cleaning attempt can create problems beyond the coil itself. Water can overflow into the air handler compartment. Insulation can stay wet. Closets and surrounding materials can absorb moisture. If the drain setup was already partially restricted, adding rinse water without understanding the path out of the unit can make a small issue bigger.
Indoor coil cleaning isn't just about washing metal. It's about protecting fins, coatings, drainage, and the area around the air handler.
That's why I'm cautious about giving homeowners a step-by-step indoor cleaning process. There are cases where a light inspection and filter maintenance are enough for a homeowner to handle. A deep evaporator cleaning is often better treated as service work.
What a homeowner can do safely
There are still a few useful things you can do without turning it into a risky project.
- Change the air filter on schedule so the evaporator coil gets less dust to begin with.
- Look for visible dirt near the access area without forcing the cabinet apart.
- Watch for water around the air handler because drainage problems often show up there first.
- Pay attention to odors and humidity since indoor coil contamination often affects both.
If you open a panel and see heavy buildup, matted debris, signs of microbial growth, or any evidence of drainage trouble, that's usually the point to stop. Indoor coils punish heavy-handed cleaning.
DIY Cleaning vs Professional Service in Tampa
A Tampa homeowner can usually handle a basic outdoor coil rinse on a Saturday morning. The trouble starts when a simple dirty-coil job turns out to be a humidity problem, a drain problem, storm debris packed deeper in the cabinet, or a system issue that cleaning will not solve.
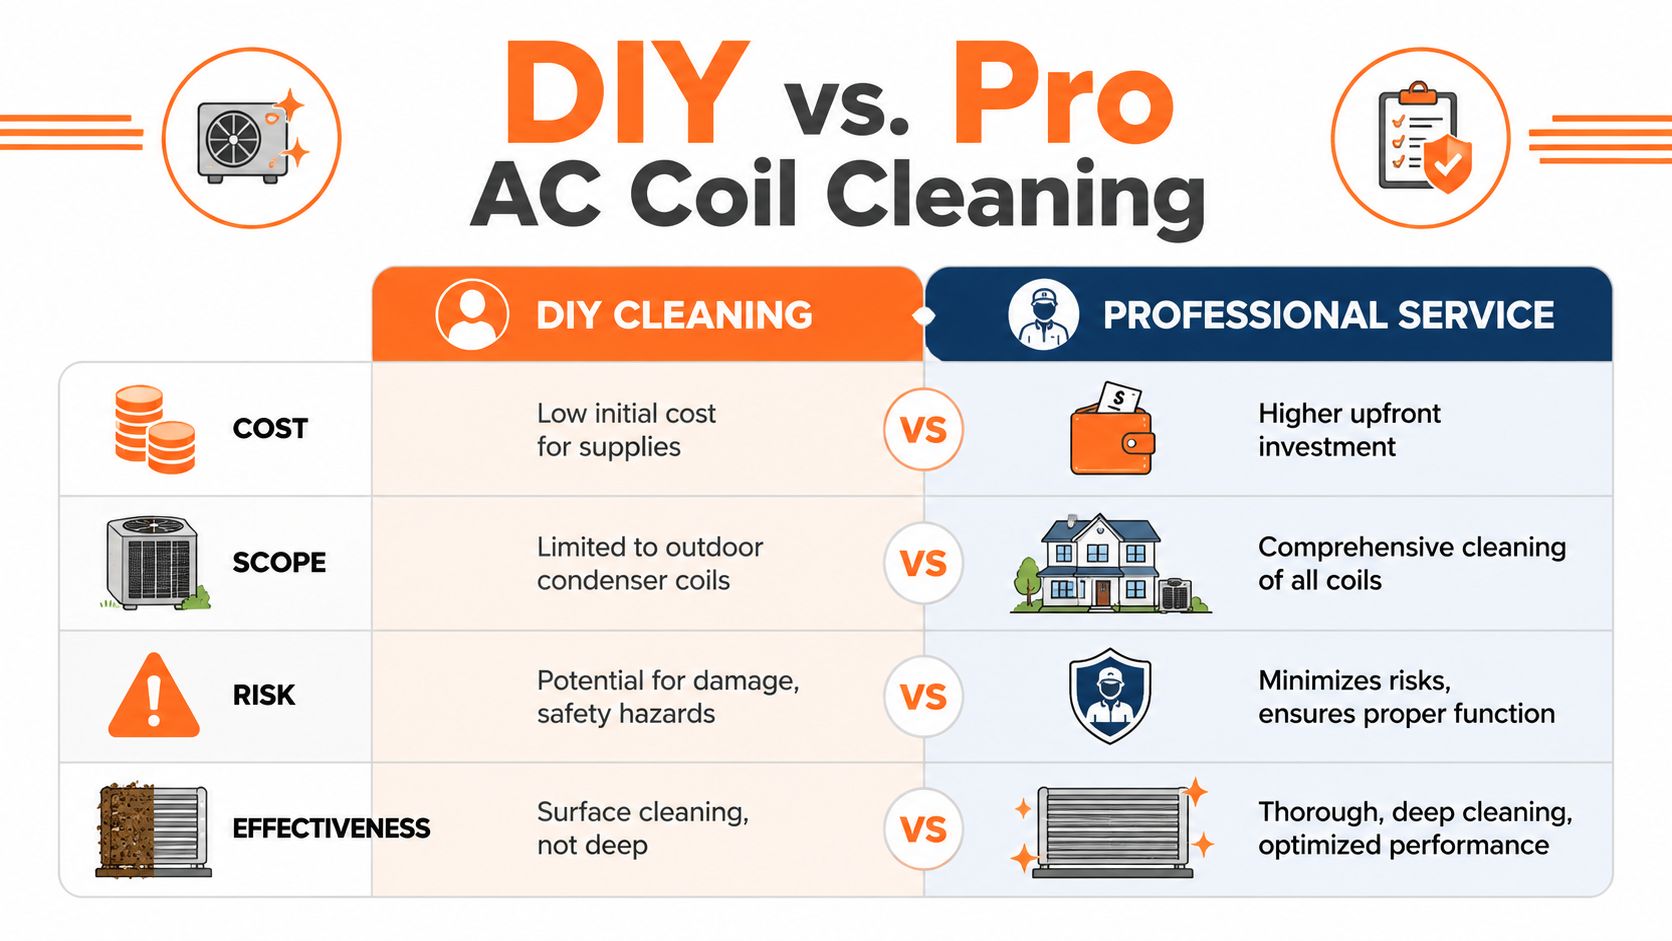
DIY outdoor cleaning makes sense when the condenser is easy to reach, the dirt is on the surface, and the unit is otherwise cooling normally. In Tampa Bay, that often means pollen, grass clippings, cottonwood-like fuzz, and storm grit stuck to the outside of the coil. If you can shut off power safely, remove light debris without bending fins, and rinse with low pressure, a homeowner cleaning is reasonable.
Professional service makes more sense when the symptoms are broader than a dirty cabinet. Weak cooling, high indoor humidity, ice, repeated drain issues, breaker trips, buzzing parts, or salt-air corrosion all point to a job that needs diagnosis along with cleaning. Along the coast, I also see condenser coils that look only mildly dirty from the yard but have a sticky film that holds grime tighter than a garden hose can remove.
CRC Industries makes a useful point in its guide. Cleaning coils will not fix every comfort complaint. If the underlying issue is refrigerant charge, airflow restriction elsewhere, or a failing electrical component, cleaning alone will not restore normal performance. CRC Industries on what coil cleaning cannot fix
Side-by-side decision guide
| If this is your situation | DIY may be reasonable | Professional service is smarter |
|---|---|---|
| Outdoor coil has loose debris and visible surface dirt | Yes | Also fine |
| Indoor coil access is tight or unclear | No | Yes |
| Unit has weak cooling plus odd noises or electrical symptoms | No | Yes |
| You want basic surface cleaning only | Yes | Optional |
| You want diagnosis with cleaning | Limited | Yes |
What a technician brings that DIY doesn't
A service call should answer a specific question. Is coil fouling the cause of the problem, or is the dirty coil only one part of it?
That distinction matters in Tampa because our systems run hard for long stretches. Long runtimes expose small problems faster. A partially restricted coil, weak capacitor, sagging blower performance, duct leakage, and high attic heat can all show up to the homeowner as, "the AC just isn't keeping up." Cleaning helps only when dirt is the part holding the system back.
A good technician also checks what the dirt may have led to. On outdoor units, that can mean higher operating stress and poor heat rejection. On indoor equipment, it can mean drainage trouble, biological growth, or airflow issues that a homeowner cannot fully inspect without opening areas that should be handled carefully.
If you're comparing providers, it helps to understand why some companies are easier to verify than others in search results. Netco Design LLC's local SEO expertise gives a useful look at how reputable home service companies build local visibility online.
Heatwave Air Conditioning, Plumbing, & Electric is one Tampa Bay company homeowners may come across while looking for AC service. You can also see an example of how customer feedback is presented in a Google review graphic for a local HVAC company.

A clean coil helps when the coil is the problem. Diagnosis is what keeps you from cleaning past the real issue.
My practical advice is simple. Handle light outdoor coil cleaning yourself if the unit is accessible, the symptoms are minor, and you can do the work safely. Call for service if the system still struggles afterward, if the problem involves the indoor side, or if you live close enough to the water that salt buildup and corrosion are part of the equation.
Proactive Tips to Keep Your Coils Cleaner Longer
A Tampa Bay condenser can get dirty fast, even when the rest of the system is in decent shape. Humidity keeps dust and pollen stuck to the coil. Near the coast, salt film adds another layer. Summer storms can pack fins with leaves, palm fibers, and yard debris in one afternoon.
Start with the area around the outdoor unit. The condenser needs open airflow, not shrubs crowding the cabinet or storage piled against it. After mowing, glance at the coil surface. Wet cabinets grab grass clippings and fine dust quickly, especially in our long cooling season.
Habits that make a real difference
- Trim back nearby growth so air can move freely through the condenser.
- Change filters on schedule to cut down on the dirt that reaches the indoor coil.
- Check the unit after storms because wind-driven debris fouls coils much faster than normal buildup.
- Rinse away light coastal residue if you live near the water and can safely access the unit with power off.
- Keep mulch, dirt, and loose yard waste away from the pad so the fan does not keep pulling it back into the coil.
Homeowners who stay ahead of coil problems usually build a simple routine. They look at the condenser after bad weather. They notice when plants start closing in. They do not wait for weak cooling and high runtime to tell them the unit is struggling.
A broader seasonal checklist helps with that mindset. Even though it covers general home upkeep, these monsoon preparation tips are a useful reminder that weather-driven maintenance works better when you pay attention to the whole property.
This seasonal home maintenance visual fits that approach well.

If you remember one thing, remember this. Outdoor AC coils cleaning is a reasonable homeowner task when the unit is accessible and you can work safely. Indoor coil cleaning needs more caution. If the dirt you can see does not explain the cooling problem, the system needs diagnosis, not another rinse.
If your AC in Tampa Bay runs for long stretches and still leaves the house muggy or uneven, Heatwave Air Conditioning, Plumbing, & Electric is one local company homeowners may contact for cooling service, maintenance, and system diagnosis. Proper cleaning helps when a dirty coil is the problem. A technician can save you time and prevent extra wear when the actual issue is airflow, drainage, refrigerant, or a failing component.