
You're usually not searching for a water softener because you woke up excited about plumbing. You're searching because the dishes keep coming out cloudy, the shower glass won't stay clean, soap doesn't lather the way it should, and your water heater is taking the hit in the background.
That's common in Tampa Bay and Southwest Florida. Homeowners in Sarasota, Port Charlotte, Cape Coral, Fort Myers, and the surrounding areas often deal with mineral-heavy water, older plumbing layouts, garage utility setups, and retrofit challenges that make the installation itself just as important as the equipment choice. If you're typing Water softener installation near me into Google, you probably want three things at once. A system that works, a clean installation, and a price that makes sense for your home.
A good install solves more than a comfort issue. It protects appliances, reduces scale buildup, and sets you up for easier maintenance later. A bad one creates drain problems, leaks, code issues, and service headaches that show up long after install day.
Why Your Florida Home Needs a Water Softener
Most homeowners first notice hard water in the small aggravations. Glassware comes out spotted. Towels feel rough. Soap leaves film on shower walls. White crust starts showing up around faucets, and the dishwasher or water heater seems to age faster than it should.
In Florida homes, those complaints usually point back to the same issue. Hard water carries minerals that leave scale behind as water moves through plumbing, fixtures, and appliances. A softener is designed to remove those hardness minerals before they circulate through the house, which is why it's often installed as a whole-house solution rather than a single-fixture fix.
The daily signs are easy to miss
A lot of homeowners wait until the problem gets expensive. They'll scrub shower doors for months, replace a failing fixture, or wonder why laundry never feels fully clean. Then they realize the pattern is house-wide.
The broader context matters. The U.S. Geological Survey notes that water classified as hard starts at 120 mg/L or more of calcium carbonate, and hard water affects more than 85% of U.S. homes to some degree, according to this water softener installation overview citing USGS hardness standards. That's why a softener isn't a luxury upgrade for a tiny slice of homes. It's a mainstream plumbing solution.
If you've seen local coverage of home service issues around the region, this kind of practical homeowner education matters just as much as the repair itself, as reflected in this Tampa Bay home-service feature image.

Practical rule: If you're seeing scale on the outside of fixtures, there's usually scale forming where you can't see it too.
Why Florida homeowners usually install sooner rather than later
In Southwest Florida, the motivation is usually practical. Homeowners want to protect the water heater, dishwasher, laundry equipment, and the home's plumbing. They also want water that feels better day to day.
The strongest reason to act isn't cosmetic. It's wear. Hard water leaves buildup inside pipes and appliances, and that buildup can turn a manageable water-quality issue into repeated maintenance calls. In many homes, that's what finally pushes the search for a nearby installer.
What works is treating the whole problem, not just the symptom. Wiping down spots from a faucet is maintenance. Installing the right softener in the right location is the fix.
Choosing the Right Water Softener System
Not every system solves the same problem the same way. In Florida homes, the decision usually comes down to how much hardness removal you want, how much maintenance you're comfortable with, and whether your household uses enough water to justify a higher-capacity setup.
The biggest mistake is buying based only on sticker price or a big-box label. The better approach is to match the system to the house, the plumbing layout, and your willingness to keep up with ownership.
The main options homeowners compare
Salt-based softeners are still the standard choice when the goal is true soft water. They're the most direct answer to hardness issues that show up on fixtures, dishes, and appliances.
Salt-free systems appeal to homeowners who want lower day-to-day involvement. They may fit some households, but they're a different type of solution. They're not the same thing as a traditional softener, and that distinction matters if your main concern is active hardness removal.
Dual-tank systems make the most sense in larger homes or homes with heavier water use. They're usually chosen because the household doesn't want interruptions in soft water availability.
Water Softener System Comparison
| System Type | How It Works | Best For | Maintenance Level |
|---|---|---|---|
| Salt-based softener | Removes hardness minerals through ion exchange | Homeowners who want the most complete softening | Moderate |
| Salt-free conditioner | Conditions water to reduce scale behavior rather than fully softening it | Homeowners looking for lower routine upkeep | Lower |
| Dual-tank softener | Uses alternating tanks to maintain soft water service | Larger households with heavier demand | Moderate to higher |
A key ownership detail often gets overlooked during the sale. Many homes with salt-based systems need a new bag of salt pellets every 4 to 6 weeks, depending on household size and water hardness, as noted in this service guidance on softener salt refill intervals. That doesn't make salt-based units a bad choice. It just means you should treat the purchase like an ongoing home system, not a one-time install.
The cheapest system to buy can become the most annoying system to own if it doesn't match your water use and maintenance habits.
What usually works best in Tampa Bay and Southwest Florida
For many local homeowners, salt-based systems remain the practical choice because they directly address the mineral problem people are complaining about. If the dishwasher is spotting, the shower glass is scaling up, and fixtures are crusting over, homeowners usually want performance first.
What doesn't work well is choosing a unit without asking these basic questions:
- How much water does the household use: A larger family and a part-time seasonal condo owner won't need the same setup.
- Where will the system go: Garage, utility room, or a tight retrofit corner can limit options.
- Do you want lower maintenance or stronger hardness removal: Those are often two different priorities.
- Will you need additional treatment: Some homes also need filtration or reverse osmosis, depending on the actual water profile.
That last point matters. A softener handles hardness. It doesn't automatically solve every water-quality issue in the house.
What to Expect During Your Installation
The actual installation day is usually much more straightforward than homeowners expect, as long as the location has been thought through in advance and the plumbing plan makes sense.
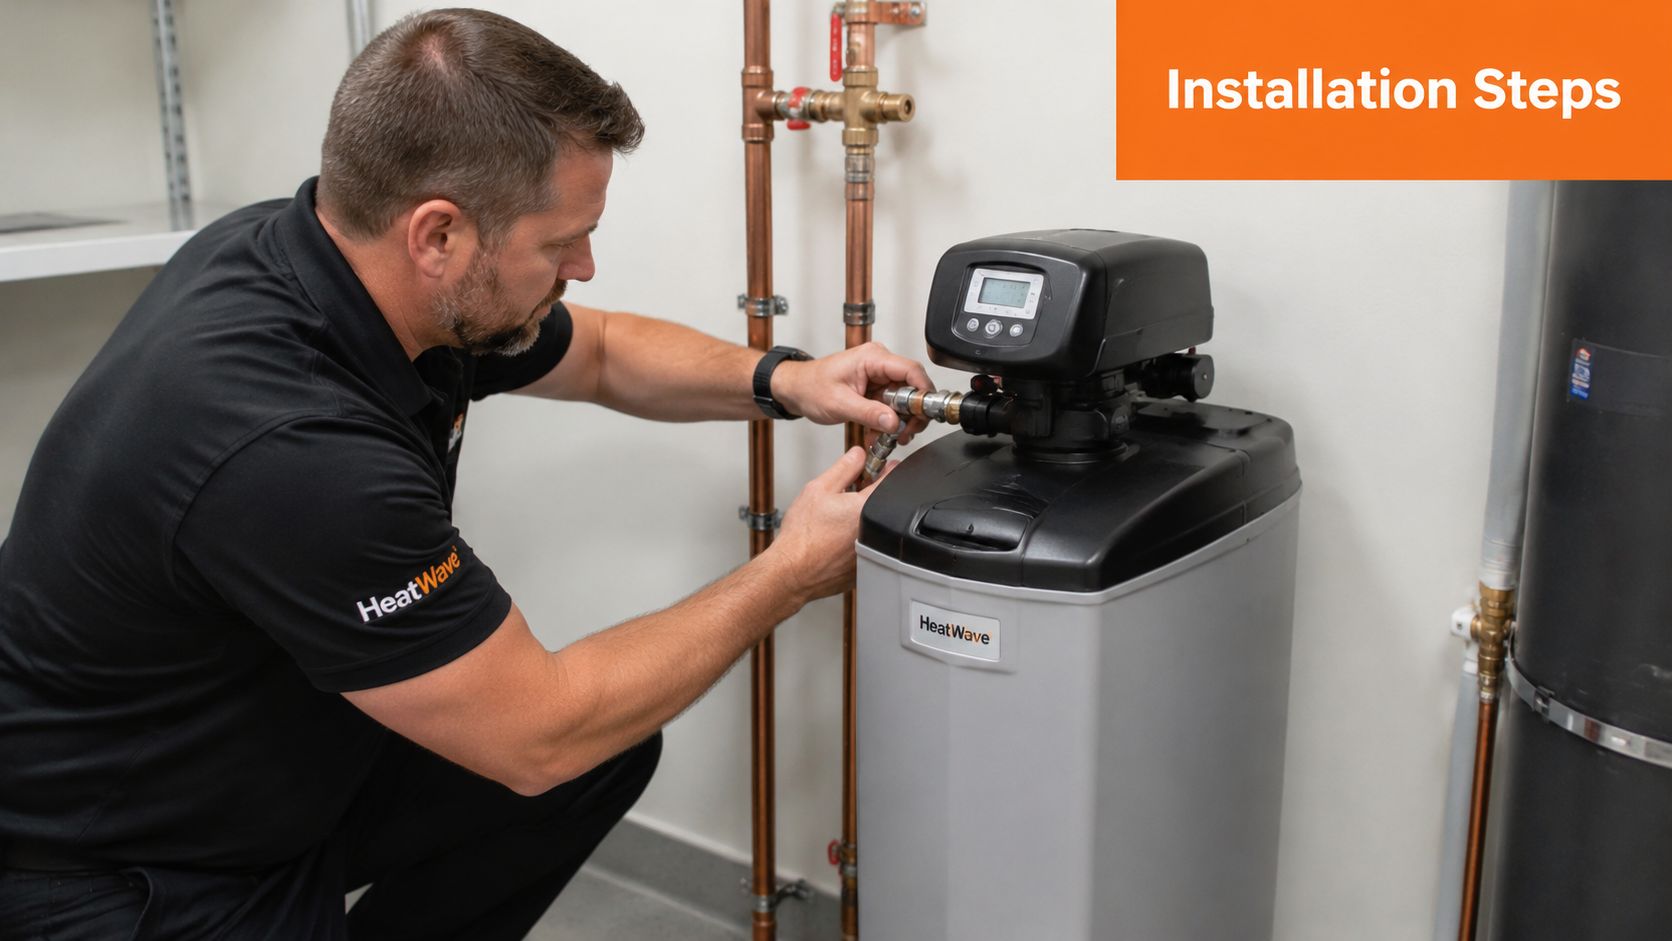
A standard residential installation typically takes 2–4 hours and needs about 9 square feet of clear workspace, plus access to the main water line, a nearby drain, and an electrical outlet, according to this installation-day guide from Culligan. That's the practical baseline most homeowners should expect when comparing bids or planning the day.
Where the softener usually goes
In a proper whole-house setup, the softener is typically installed on the main water line before the hot-water branch. That way, treated water reaches the fixtures and appliances it's supposed to protect.
In Florida homes, the common installation areas are garages, utility rooms, or service spaces near the main water entry point. Some homes are easy. Others are retrofits with tight clearances, awkward drain access, or older shutoff arrangements that need more planning before anyone starts cutting pipe.
An experienced installer stands out. The job isn't just connecting a box. It's working cleanly within the actual structure of the home. You can see the kind of home-service environment these jobs often happen in through this field-work image from a local service setting.

What happens step by step
A professional visit usually follows a clear sequence:
Site review and prep
The installer confirms the water entry point, drain route, outlet access, and the final equipment location.Water shutoff and line drain-down
The main supply gets shut off, and the lines are drained so the plumbing can be opened safely.Bypass and connection work
The installer cuts into the line, sets the bypass arrangement, and connects supply and drain lines.Startup and programming
Once the unit is connected, the system is filled, checked, and programmed.
Here's a visual walkthrough that helps homeowners understand the installation flow before the crew arrives:
What a smooth install day looks like
You shouldn't see chaos. A quality installation feels organized. The crew needs room to work, but the process should still feel controlled from arrival to cleanup.
What works best on your end is simple:
- Clear the area: Move storage bins, cleaners, or anything stacked around the install point.
- Know where the main shutoff is: Even if the technician handles it, that saves time.
- Keep a path open: Softener tanks and equipment need to move through the home or garage without obstacles.
If a contractor can't explain the install sequence in plain language, that's usually a warning sign.
Understanding Local Costs and Financing Options
Most homeowners asking about water softener installation near me are really asking two separate questions. What will the equipment cost, and what will the plumbing work cost to put it in correctly?
The honest answer is that price depends heavily on the house. A straightforward install in a home with accessible plumbing, drain access, and a practical location is one kind of job. A retrofit in an older Florida home with tight space, extra line routing, or code complications is another.
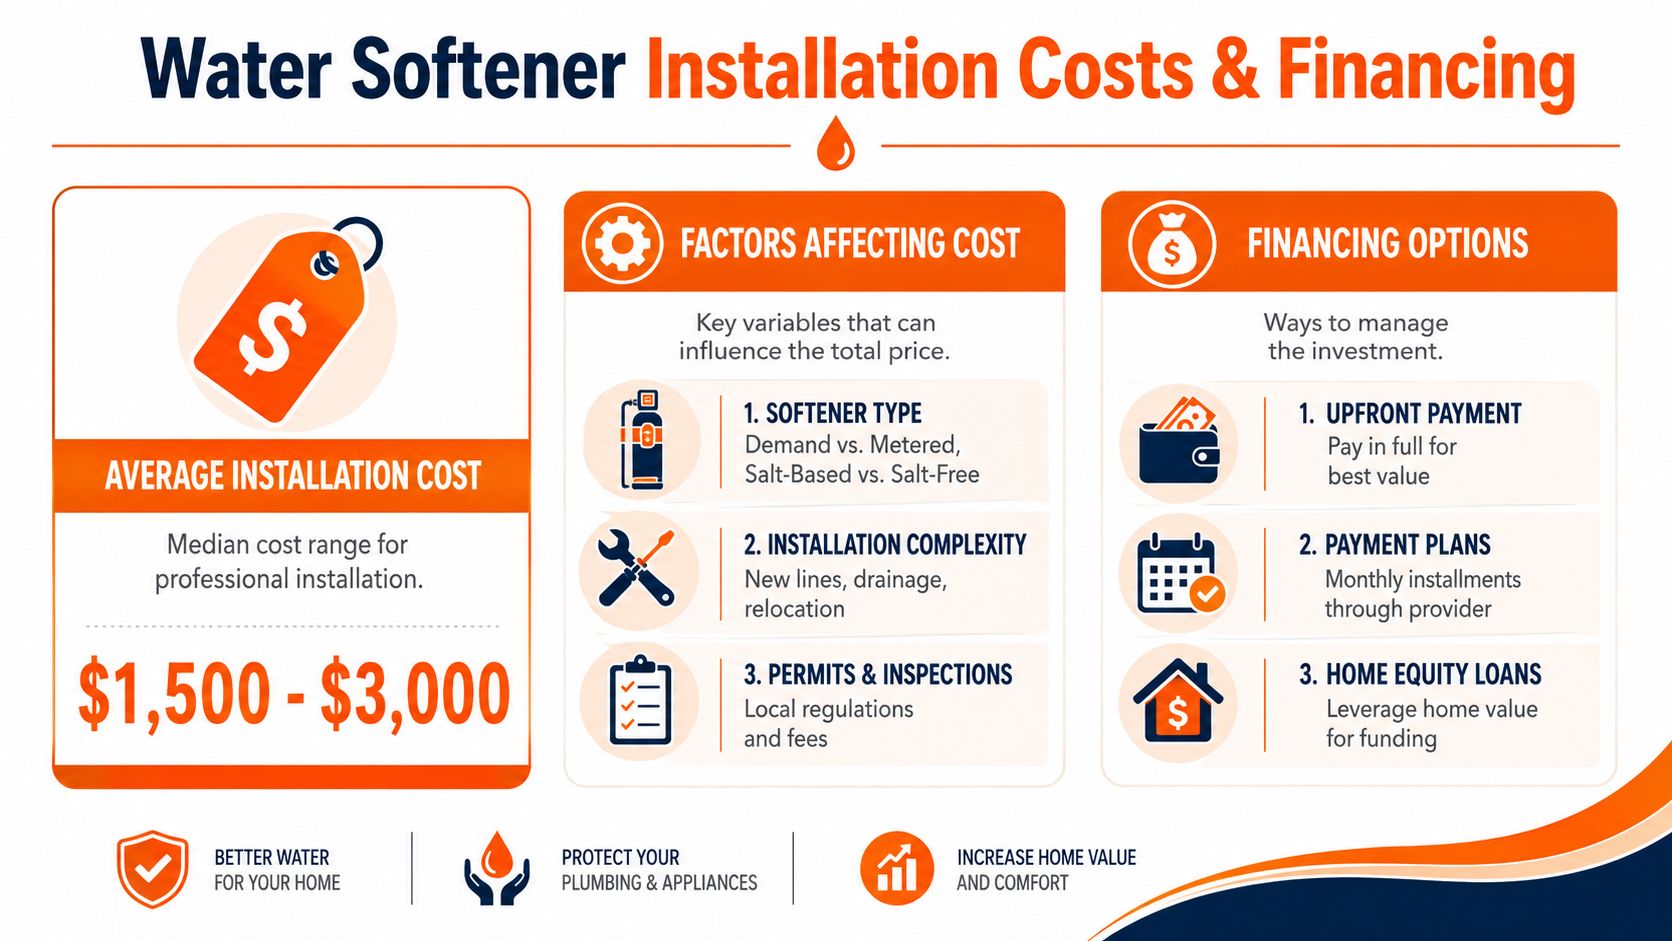
What drives the final price
The largest cost drivers are usually the system itself, the installation complexity, and whether the existing plumbing supports a clean install location.
In Tampa Bay and Southwest Florida, these factors usually push the quote up or down:
- System type: Salt-based, salt-free, and dual-tank systems land in different price brackets.
- Capacity and sizing: Larger households or heavier water use can require a larger unit.
- Retrofit difficulty: New drain routing, relocation, or work on older plumbing adds labor.
- Permits and inspections: Some jobs are simple. Others involve more administrative and code-related work.
The planning image in this local project and financing visual reflects the truth that homeowners often need the project to fit both the house and the budget.

A practical cost range
Professional installations commonly land in the $1,500 – $3,000 range for many homeowners, but that number should be treated as a general market benchmark rather than a promise for every home. The reason is simple. Installation labor isn't identical from house to house, and neither is the equipment.
A low quote that skips layout review, code questions, or drain planning can become the most expensive option after the install is done.
Why financing comes up so often
Water quality work is usually planned around need, not perfect timing. A homeowner might already be replacing a water heater, dealing with fixture scaling, or preparing a home for long-term occupancy. In that situation, financing can make a practical upgrade easier to schedule without waiting.
Common ways homeowners handle the investment include:
- Upfront payment: Best for owners who want the project closed out in one transaction.
- Provider payment plans: Helpful when the install is necessary now but cash flow matters.
- Home equity funding: Sometimes used when the work is part of a larger plumbing or home-improvement plan.
What matters most isn't whether you finance. It's whether the quote is itemized clearly enough that you understand what you're paying for.
Your Homeowner Prep and Installer Questions Checklist
A smooth installation starts before anyone unloads tools. Homeowners who prep the space and ask the right questions usually get a cleaner job and fewer surprises.
That matters even more in Florida, where installation feasibility often depends on code compliance, drain routing, and available space, and where the better installer is usually the one who checks plumbing layout, water pressure, and local code requirements before quoting, as described in this local installer guidance on water softener planning.
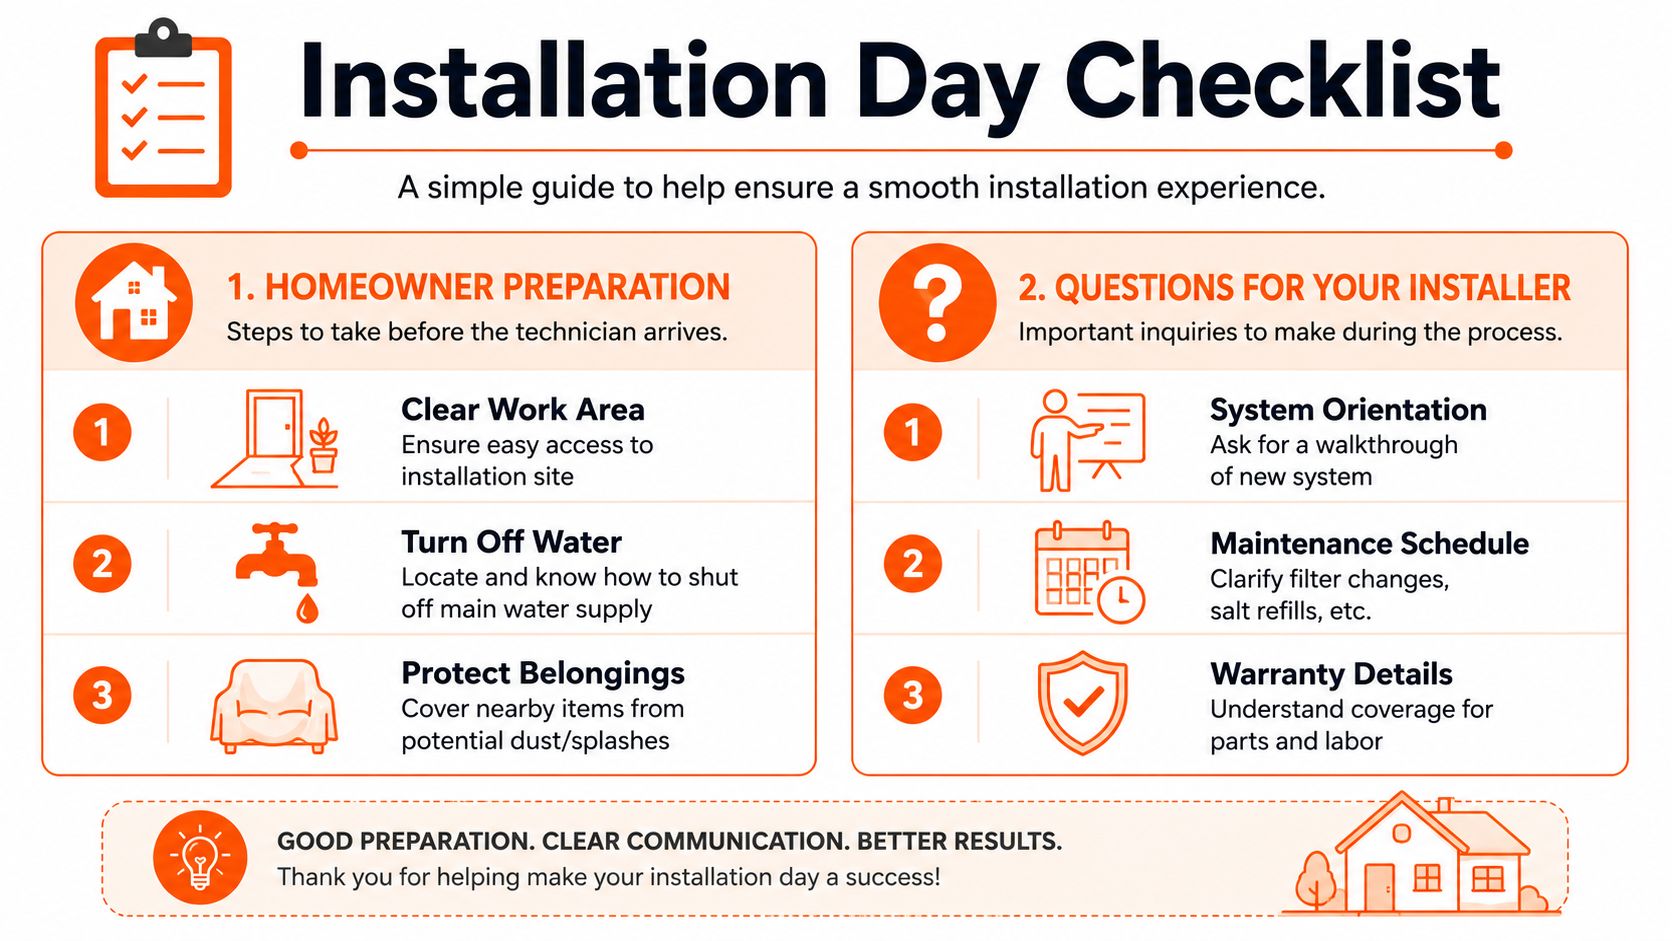
Prep the house before install day
The homeowner side of the job isn't complicated, but it does help.
- Clear work area: Remove stored items, paint cans, shelves, or clutter near the proposed install point.
- Locate the main water shutoff: You may never need to touch it, but knowing where it is speeds up coordination.
- Protect nearby belongings: If the install area is in a garage or utility space, move anything sensitive to dust or splashing.
- Make access easy: Make side gates, utility closets, or garage paths accessible if that's how the technician reaches the plumbing.
If you've ever done seasonal plumbing prep around the house, the same principle applies here. Simple access saves time and reduces mistakes. This home plumbing readiness visual lines up with that same idea.

Questions worth asking before you hire anyone
Don't just ask for price. Ask how they arrived at it.
Here are the questions that separate a serious installer from someone quoting blind:
- Will you evaluate the actual plumbing layout before finalizing the quote: That matters in older homes and garage retrofits.
- What drain route are you planning to use: Drain access is one of the details that can make or break the job.
- How will the bypass be set up: You want to know the system can be isolated for service later.
- Are there any local code or permit issues for my city or neighborhood: Tampa, Sarasota, Cape Coral, and Fort Myers homes don't always present the same constraints.
- What maintenance should I expect after installation: Ownership doesn't end when the installer leaves.
- What warranty applies to parts and labor: Get that answer clearly and in writing.
Ask the installer to explain the layout using your house, not a generic brochure. A real pro can point to the exact shutoff, drain route, bypass location, and power source.
What doesn't work
What fails homeowners most often is hiring based on proximity alone. The closest company isn't automatically the best choice if they haven't checked drain routing, pressure conditions, or whether the location physically supports the unit.
That's especially true in Florida retrofits. The best installer is the one who spots the problem before the installation starts.
Recognizing a Quality Installation and Long-Term Care
Once the install is finished, most homeowners judge the job by one thing. Is there a leak? That's important, but it isn't the full standard.
A quality installation should look orderly, function properly, and leave you with a system that's easy to service later. The plumbing should be neat. The bypass should be accessible. The drain setup should make sense. The area should be clean when the crew leaves.

What to look at before the technician leaves
The highest-risk installation failures are pressure handling, drainage, and bypass setup. Rheem's installation guidance specifies incoming pressure should be within 20–125 psi, and it emphasizes shutting off the main supply, draining the lines, installing the bypass, reconnecting supply and drain lines, then testing for leaks before programming the unit, as shown in this DIY installation checklist from Rheem Water Treatment.
Those details give homeowners a simple post-install inspection list:
- No visible leaks: Check around fittings, valve connections, and the base area.
- Bypass is present and accessible: You shouldn't have to dismantle the install to service it.
- Drain line is secure: It should look intentional, not improvised.
- Startup was done slowly: Fast repressurization is where sloppy installs often show up.
- You got a walkthrough: You should know how to bypass the unit and what routine care it needs.
Signs the installer took the job seriously
Good workmanship is visible. Lines are straight. Connections are secure. The equipment placement leaves enough room for service access. Nothing looks forced into place.
The final walkthrough matters too. A homeowner should leave the appointment knowing how the system works, what normal operation looks like, and when to call for service. That kind of handoff is part of the installation, not an extra.
You can see how strongly homeowners value that complete service experience in this customer review graphic from Heatwave.

Good installation work is easy to live with. Bad installation work keeps asking for your attention.
Long-term care after the install
Once the system is in, long-term performance comes down to routine attention and using the right system for the home in the first place. Homeowners should understand the maintenance plan, know what normal water quality feels like, and keep an eye on the basics the installer pointed out during startup.
The long-term value of a professional install is simple. Better appliance protection, more consistent water quality, easier service, and fewer preventable plumbing problems. That's what homeowners are really buying when they stop searching for water softener installation near me and choose a qualified local expert.
If you're ready to fix hard water the right way, Heatwave Air Conditioning, Plumbing, & Electric can help with professional water softener installation, clear recommendations for your home, and financing options that make the project easier to manage. Whether you're in Tampa Bay, Sarasota, Port Charlotte, Cape Coral, or Fort Myers, their team handles plumbing work with the kind of local experience Florida homes demand.